
Ocelot API Gateway: Routing & Aggregation & Authentication

API Gateway, client ile mikro servisler arasında yer alarak bir reverse proxy olarak çalışır. Client tarafından aldığı istekleri bir takım kurallar doğrultusunda ilgili servislere dağıtır. Bu sayede çeşitli güvenlik zaafiyetlerinin önüne geçerken aynı zamanda istemcinin tüm servisler yerine tek bir API üzerinden konuşmasını sağlar. Ocelot Api Gateway aracılığıyla Routing, Request Aggregation, Authentication, Authorization, Rate Limiting, Caching ve Load Balancing gibi çeşitli işlemleri yerine getirebiliriz.
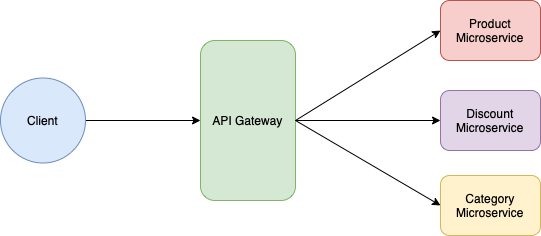
Ocelot, .NET Core için geliştirilen bir Api Gateway kütüphanesidir. Bir ASP.NET projesini Api Gateway‘e çevirmek için Ocelot isimli Nuget paketini kurmak gereklidir. Yukarıda da görüldüğü üzere mikro servis endpoint’leri expose olmaksızın client sadece API Gateway ile haberleşmektedir. Bu sayede servis ağının yönetilmesi de kolaylaşmaktadır. Buna ilaveten giriş paragrafında sayılan özelliklere de sahiptir. Ayrıca görseldeki servisler senaryomuzda kullanılacaktır.
Senaryo
Senaryomuzda ürünleri listeleyen bir Product servisi, ürün indirimlerini getiren Discount servisi, ürün kategorilerini barındıran Category servisi ve API Gateway projesi yer alacaktır. Projelerimizi webapi tipinde oluşturup, API Gateway projesine Ocelot Nuget paketini kuralım.
Konuyu pekiştirmek adına Routing, Authentication, Request Aggregation ve Rate Limiting konularına göz atıyor olacağız. Projelerimizi oluşturduktan sonra Controller sınıflarımızı aşağıdaki şekillerde dolduralım.
[ApiController]
[Route("[controller]")]
public class ProductController : ControllerBase
{
    private readonly List<Product> Products = new()
    {
        new() { Id = 1, CategoryId = 1, Title = "Laptop", Price = 2500 },
        new() { Id = 2, CategoryId = 2, Title = "Monitor", Price = 1500 },
        new() { Id = 3, CategoryId = 3, Title = "Keyboard", Price = 500 },
    };

    [HttpGet]
    public IEnumerable<Product> Get() => Products;

    [HttpGet("{id}")]
    public Product? Get(int id) => Products.FirstOrDefault(f => f.Id == id);
}

public class Product
{
    public int Id { get; set; }
    public int CategoryId { get; set; }
    public string Title { get; set; }
    public decimal Price { get; set; }
}
Görüldüğü üzere Product servisinde Product sınıfı ve statik veri döndüren iki adet action method’u tanımlanmıştır.
[ApiController]
[Route("[controller]")]
public class DiscountController : ControllerBase
{
    private readonly List<Discount> Discounts = new()
    {
        new() { Id = 1, ProductId = 1, Amount = 150, ValidUntil = DateTime.UtcNow.AddDays(1) },
        new() { Id = 2, ProductId = 3, Amount = 50, ValidUntil = DateTime.UtcNow.AddDays(10) },
    };

    [HttpGet("{id}")]
    public Discount? Get(int id) => Discounts.FirstOrDefault(f => f.ProductId == id);
}

public class Discount
{
    public int Id { get; set; }
    public int ProductId { get; set; }
    public decimal Amount { get; set; }
    public DateTime ValidUntil { get; set; }
}
Discount servisindeyse yine gerekli tanımlamalar yapılıyor.
[ApiController]
[Route("[controller]")]
public class CategoryController : ControllerBase
{
    private readonly List<Category> Categories = new()
    {
        new() { Id = 1, Title = "Laptop" },
        new() { Id = 2, Title = "Monitor" },
        new() { Id = 3, Title = "Keyboard" },
    };

    [HttpGet]
    public IEnumerable<Category> Get() => Categories;
}

public class Category
{
    public int Id { get; set; }
    public string Title { get; set; }
}
Category servisi içinde gerekli tanımlamalar yapıldıktan sonra servisleri ayağa kaldıracağımız portları ayarlayalım. Product servisini :7001, Discount servisini :7002 ve Category servisini de :7003 portunda çalışacak şekilde ayarlayalım.
API Gateway projemizi geliştirelim. Öncelikle Ocelot NuGet paketini kurmamız gerekiyor. Sonrasındaysa Program.cs dosyasına gelerek gerekli ayarlamaları yapalım.
var builder = WebApplication.CreateBuilder(args);

builder.Configuration.AddJsonFile($"ocelot.{Environment.GetEnvironmentVariable("ASPNETCORE_ENVIRONMENT")}.json");

builder.Services.AddOcelot()
    .AddDelegatingHandler<RequestLogger>();

var app = builder.Build();

app.UseOcelot();

app.Run();


public class RequestLogger : DelegatingHandler
{
    private readonly ILogger<RequestLogger> _logger;

    public RequestLogger(ILogger<RequestLogger> logger)
    {
        _logger = logger;
    }

    protected override Task<HttpResponseMessage> SendAsync(HttpRequestMessage request, CancellationToken cancellationToken)
    {
        _logger.LogInformation($"Request [{request.Method}] - {request.RequestUri}");
        return base.SendAsync(request, cancellationToken);
    }
}
Öncelikle AddJsonFile methoduyla Ocelot konfigürasyonlarını barındıran .json dosyasını ekliyoruz. Sonrasındaysa AddOcelot ile bildirim yapıyoruz ve ardından AddDelegatingHandler ile HttpClient isteklerini Intercept edeceğimizi RequestLogger sınıfıyla bildiriyoruz.
Delegate Handler DelegatingHandler abstract sınıfından türemelidir. Bu sınıf aracılığıyla http isteklerini intercept ederek akışı değiştirebiliriz. Biz örneğimizde loglama yapıyoruz.
Routing
Ocelot konfigürasyonları bir .json dosyasında tutulmaktadır. Gelen isteklerin nereye, ne şekilde iletileceği kurallarıyla diğer tüm özellik bildirimlerini bu dosyadan belirteceğiz. Ayarlamalarımızı yapmak üzere ocelot.json isminde bir dosya oluşturup Route’larımızı belirtelim.
{
  "Routes": [
    {
      "DownstreamPathTemplate": "/product",
      "DownstreamScheme": "https",
      "DownstreamHostAndPorts": [
        {
          "Host": "localhost",
          "Port": 7001
        }
      ],
      "UpstreamPathTemplate": "/products",
      "UpstreamHttpMethod": ["Get"]
    },
    {
      "DownstreamPathTemplate": "/product/{id}",
      "DownstreamScheme": "https",
      "DownstreamHostAndPorts": [
        {
          "Host": "localhost",
          "Port": 7001
        }
      ],
      "UpstreamPathTemplate": "/products/{id}",
      "UpstreamHttpMethod": ["Get"],
    },
    {
      "DownstreamPathTemplate": "/discount/{id}",
      "DownstreamScheme": "https",
      "DownstreamHostAndPorts": [
        {
          "Host": "localhost",
          "Port": 7002
        }
      ],
      "UpstreamPathTemplate": "/discounts/{id}",
      "UpstreamHttpMethod": ["Get"],
    },
    {
      "DownstreamPathTemplate": "/category",
      "DownstreamScheme": "https",
      "DownstreamHostAndPorts": [
        {
          "Host": "localhost",
          "Port": 7003
        }
      ],
      "UpstreamPathTemplate": "/categories",
      "UpstreamHttpMethod": ["Get"]
    }
  ],
  "GlobalConfiguration": {
    "BaseUrl": "https://localhost:7000"
  }
}
Downstream önekiyle başlayan özellikler gelen isteğin nereye yönlendirileceği, Upstream önekiyle başlayan özellikler ise gelen isteği karşılayacak olan ayarları içermektedir. Buna göre Ocelot API Gateway‘e /products adresinden bir GET isteği gönderildiğinde bu isteğin https://localhost:7001/product adresine yönlendirileceğini belirtiyoruz. Ayrıca GlobalConfiguration özelliğiyle genel ayarları yapıyoruz.
Request Aggregation
Ocelot ile birden fazla servise istek atarak sonucu tek bir istekle birleştirilmiş şekilde alabiliriz. Bunun için Key ve Aggregates özelliklerinden faydalanmaktayız. Konfigürasyon dosyamızı aşağıdaki şekilde düzenleyelim.
{
  "Routes": [
    {
      "DownstreamPathTemplate": "/product/{id}",
      "DownstreamScheme": "https",
      "DownstreamHostAndPorts": [
        {
          "Host": "localhost",
          "Port": 7001
        }
      ],
      "UpstreamPathTemplate": "/products/{id}",
      "UpstreamHttpMethod": ["Get"],
      "Key": "Product"
    },
    {
      "DownstreamPathTemplate": "/discount/{id}",
      "DownstreamScheme": "https",
      "DownstreamHostAndPorts": [
        {
          "Host": "localhost",
          "Port": 7002
        }
      ],
      "UpstreamPathTemplate": "/discounts/{id}",
      "UpstreamHttpMethod": ["Get"],
      "Key": "Discount"
    }
  ],
  "Aggregates": [
    {
      "RouteKeys": ["Product", "Discount"],
      "UpstreamPathTemplate": "/product-with-discount/{id}"
    }
  ]
}
Buna göre öncelikle route‘larımızı belirli bir key ile işaretliyoruz. Sonrasındaysa Aggregates dizisi içerisinde verilen key’lerin birleştirilerek hangi adres üzerinden expose edileceğini belirtiyoruz.
Rate Limiting
Ocelot ayrıca rate limit özelliğini de destekler. Upstream istekleri limitleyerek downstream servislerin overload olmasını önleyebiliriz.
{
  "Routes": [
    {
      "DownstreamPathTemplate": "/category",
      "DownstreamScheme": "https",
      "DownstreamHostAndPorts": [
        {
          "Host": "localhost",
          "Port": 7003
        }
      ],
      "UpstreamPathTemplate": "/categories",
      "UpstreamHttpMethod": ["Get"],
      "RateLimitOptions": {
        "ClientWhitelist": [],
        "EnableRateLimiting": true,
        "Period": "1s",
        "PeriodTimespan": 1,
        "Limit": 1
      }
    }
  ]
}
Görüldüğü üzere bu özelliği RateLimitOptions özelliğini kullanarak aktifleştiriyoruz.
- ClientWhitelist: Bu durumdan etkilenmeyecek istemci ip adresleri belirtiliyor,
- EnableRateLimiting: Özellik aktifliği ayarlanıyor,
- Period: Limit ile belirtilen isteklerin ne kadar süre içerisinde yapılabileceği,
- PeriodTimespan: İstemcinin limiti aşması durumunda ne kadar süre bekletileceği,
- Limit: Period ile belirtilen süre içerisinde yapılabilecek istek sayısı belirtiliyor.
Response Caching
Ocelot, Ocelot.Cache.CacheManager Nuget paketi aracılığıyla basit bir cache mekanizması da sunar. Özelliği kullanmak için paketi API Gateway projemize kuralım ve Program.cs dosyasında caching bildirimini yapalım.
builder.Services.AddOcelot()
    .AddDelegatingHandler<RequestLogger>()
    .AddCacheManager(settings => settings.WithDictionaryHandle());
ocelot.json dosyasında ilgili özelliği ekleyelim.
{
  "Routes": [
    {
      "DownstreamPathTemplate": "/product",
      "DownstreamScheme": "https",
      "DownstreamHostAndPorts": [
        {
          "Host": "localhost",
          "Port": 7001
        }
      ],
      "UpstreamPathTemplate": "/products",
      "UpstreamHttpMethod": ["Get"],
      "FileCacheOptions": { "TtlSeconds": 15 }
    }
  ]
}
FileCacheOptions ile TtlSeconds özelliğinde 15 saniye cache yapılacağı belirtilmiştir. Ayrıca konu başında da kullanılan Delegate Handler ile custom caching mekanizmaları oluşturulabilir.
Authentication
Ocelot ile route bazlı Authentication ve Authorization işlemlerini de gerçekleştirebiliriz, bu yazıda sadece Authentication özelliği üzerinde durulacaktır. Kimlik doğrulama işlemi client tarafından gönderilecek olan Token vasıtasıyla gerçekleştirilmektedir.
Bunun için servislerimiz arasına JWT Token üretecek bir Auth servis ekleyelim. Microsoft.AspNetCore.Authentication.JwtBearer NuGet paketini kurduktan sonra Controller sınıfımızı aşağıdaki gibi dolduralım.
[ApiController]
[Route("[controller]")]
public class AuthController : ControllerBase
{
    private readonly IConfiguration _configuration;

    public AuthController(IConfiguration configuration)
    {
        _configuration = configuration;
    }

    [HttpPost("sign-in")]
    public AuthToken? Post([FromBody] User user)
    {
        var now = DateTime.UtcNow;
        var jwt = new JwtSecurityToken(
                 notBefore: now,
                 expires: now.Add(TimeSpan.FromMinutes(2)),
                 signingCredentials: new SigningCredentials(new SymmetricSecurityKey(Encoding.ASCII.GetBytes(_configuration["SecretKey"])), SecurityAlgorithms.HmacSha256)
             );

        return new AuthToken
        {
            AccessToken = new JwtSecurityTokenHandler().WriteToken(jwt),
            Expires = TimeSpan.FromMinutes(2).TotalSeconds
        };
    }
}

public class User
{
    public string Username { get; set; }
    public string Password { get; set; }
}

public class AuthToken
{
    public string AccessToken { get; set; }
    public double Expires { get; set; }
}
Sonrasındaysa kategori servisinde Controller sınıfımızı Authorize attribute’ü ile işaretleyerek Program.cs içerisinde gerekli yetkilendirme ayarlamalarını yapalım. Ayrıca aşağıdaki yetkilendirme ayarlarını API Gateway projesinde de yapmalıyız.
builder.Services.AddAuthentication(options =>
{
    options.DefaultAuthenticateScheme = JwtBearerDefaults.AuthenticationScheme;
    options.DefaultChallengeScheme = JwtBearerDefaults.AuthenticationScheme;
}).AddJwtBearer(options =>
{
    options.RequireHttpsMetadata = false;
    options.SaveToken = true;
    options.TokenValidationParameters = new TokenValidationParameters
    {
        IssuerSigningKey = new SymmetricSecurityKey(Encoding.UTF8.GetBytes(builder.Configuration.GetValue<string>("SecretKey"))),
        ValidateIssuerSigningKey = true,
        ValidateIssuer = false,
        ValidateAudience = false
    };
});

// Other configurations

app.UseAuthentication();
Son olarak ocelot.json dosyasına hem Auth servisini ekleyelim hem de Category servisini yetkilendirmeye tabi tutalım.
{
  "Routes": [
    {
      "DownstreamPathTemplate": "/category",
      "DownstreamScheme": "https",
      "DownstreamHostAndPorts": [
        {
          "Host": "localhost",
          "Port": 7003
        }
      ],
      "UpstreamPathTemplate": "/categories",
      "UpstreamHttpMethod": ["Get"],
      "AuthenticationOptions": {
        "AuthenticationProviderKey": "Bearer",
        "AllowedScopes": []
      }
    },
    {
      "DownstreamPathTemplate": "/auth/sign-in",
      "DownstreamScheme": "https",
      "DownstreamHostAndPorts": [
        {
          "Host": "localhost",
          "Port": 7004
        }
      ],
      "UpstreamPathTemplate": "/sign-in",
      "UpstreamHttpMethod": ["Post"]
    }
  ]
}
Yukarıdaki koda baktığımızda yetkilendirmeyi AuthenticationOptions ile aktif ettiğimizi görüyoruz. AuthenticationProviderKey ile yetkilendirmenin hangi AuthenticateScheme üzerinden yapılacağını belirtiyoruz. Artık Category servisine istekte bulunurken Auth servis üzerinden alacağımız token bilgisiyle istekte bulunabiliriz.
Load Balancing
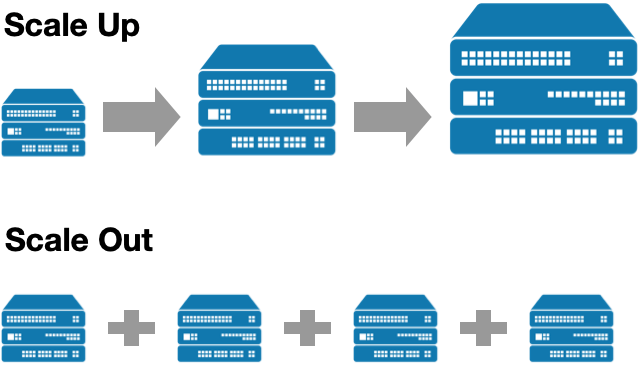
Yük dengelemeyle artan trafik veya yük sonucu oluşabilecek yoğunluğu dengeleyebiliriz. Bunu sistemin upgrade edilerek scale-up / vertical scaling işlemi yapılması yerine, sisteme yeni sunucuların eklenerek scale-out / horizontal scaling işlemi yapılmasıyla sağlıyoruz.
Bu dengeleme işleminin nasıl yapılacağı bir takım algoritmalara göre belirlenmektedir.
- Round Robin: Gelen isteklerin sunucular arasında sırayla dağıtıldığı algoritmadır.
- Least Connection: Gelen isteklerin en az yoğunlukta olan sunucuya yönlendirildiği algoritmadır.
- IP Hash: Gelen isteklerin IP adreslerine göre hangi sunucuya yönlendirileceğini belirten algoritmadır.
Discount servisini Dockerize ederek farklı portlarla ayağa kaldırıp Ocelot’un gelen istekleri nasıl dağıttığına göz atalım.
touch Dockerfile
docker build -t discounts .
docker run -d -p 7010:80 -p 7011:80 -p 7012:80 discounts
Oluşturduğumuz Dockerfile’ı aşağıdaki gibi dolduralım.
FROM mcr.microsoft.com/dotnet/sdk:6.0-alpine as build
WORKDIR /app

COPY *.csproj ./
RUN dotnet restore

COPY . ./
RUN dotnet publish -c Release -o out

FROM mcr.microsoft.com/dotnet/aspnet:6.0-alpine as runtime
WORKDIR /app
COPY --from=build /app/out .
ENTRYPOINT ["dotnet", "Discount.Service.dll"]
Sonrasındaysa ocelot.json dosyasında Load Balancer ayarlarını yapalım.
{
  "Routes": [
    {
      "DownstreamPathTemplate": "/discount/{id}",
      "DownstreamScheme": "https",
      "DownstreamHostAndPorts": [
        {
          "Host": "localhost",
          "Port": 7010
        },
        {
          "Host": "localhost",
          "Port": 7011
        },
        {
          "Host": "localhost",
          "Port": 7012
        }
      ],
      "UpstreamPathTemplate": "/discounts/{id}",
      "UpstreamHttpMethod": ["Get"],
      "LoadBalancerOptions": {
        "Type": "LeastConnection"
      }
    }
  ]
}
Yukarıdaki koda baktığımızda yük dengelemeyi LoadBalancerOptions ile aktif ettiğimizi görüyoruz. Type ile dengelemenin ne şekilde yapılacağını belirtiyoruz. Bu algoritmalar LeastConnection, RoundRobin, NoLoadBalancer veya CookieStickySessions tipinde olabilir. Ayrıca kendi custom load balancer‘ımızı da yazabiliriz. Aşağıda basit bir RoundRobin simüle edilmiştir.
public class CustomLoadBalancer : ILoadBalancer
{
    private readonly Func<Task<List<Service>>> _services;
    private readonly object _lock = new();
    private int _last;

    public CustomLoadBalancer(Func<Task<List<Service>>> services)
    {
        _services = services;
    }

    public async Task<Response<ServiceHostAndPort>> Lease(HttpContext httpContext)
    {
        var services = await _services();
        lock (_lock)
        {
            if (_last >= services.Count)
            {
                _last = 0;
            }

            var next = services[_last];
            _last++;
            return new OkResponse<ServiceHostAndPort>(next.HostAndPort);
        }
    }

    public void Release(ServiceHostAndPort hostAndPort) { }
}
Sonrasındaysa LoadBalancerOptions özelliğini aşağıdaki gibi düzelterek yazdığımız custom load balancer‘ı kullanabiliriz.
"LoadBalancerOptions": {
  "Type": "CustomLoadBalancer"
}
Görüldüğü üzere mikro servis veya servis odaklı mimarilerde Ocelot bir çok işlemi efektif şekilde yerine getiriyor. Geliştirilen proje dosyalarına buradan ulaşabilirsiniz.


